Vue.jsとFirebaseでログインとログアウトを実装する②
1.はじめに
こんにちは、アイスマイル合同会社の李です。
本連載では、Vue.jsとFirebaseを利用して、ログインとログアウトを実装したいと思います。
今回は、ログイン機能をFirebase Authenticationを使って、実装していきたいと思います。
※本連載では、Firebase Local Emulator Suiteを利用し、ローカル環境に限定された環境で行うため、本番環境に上げる際は別途考慮が必要であること、公式のドキュメント等ご確認いただけますようよろしくお願いいたします。
2.今回実装する機能
今回は下記の実装を行います。
・ログイン画面の作成
・Firebase Authenticationとの連携
・ログアウト機能実装
3.ログイン画面の作成
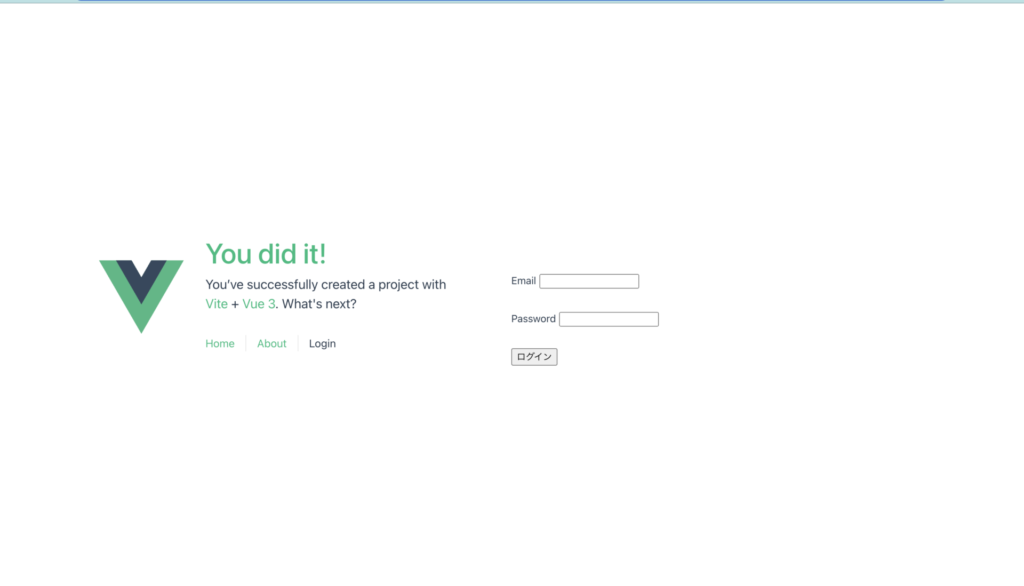
ログイン画面を作成します。
vue-firebase/src/components/配下に、LoginView.vueというファイルを作成しましょう。
中身は下記のようにします。
<script setup lang="ts">
//後で追記します。
</script>
<template>
  <div class="login">
    <div class="form-item">
      <label for="email">Email</label>
      <input id="email" autocomplete="off" type="text">
    </div>
    <div class="form-item">
      <label for="password">Password</label>
      <input id="password" autocomplete="off" type="password">
    </div>
    <div class="form-item">
      <button class="button">ログイン</button>
    </div>
  </div>
</template>

<style scoped>
.login {
  margin-top: 2rem;
}
.form-item {
  margin-top: 2rem;
}
label {
  margin-right: 0.3rem;
}

</style>
次にルーティングを設定します。
vue-firebase/src/router/index.tsに、ログインのpathを登録してください。
登録後のvue-firebase/src/router/index.tsは下記のようになっています。
import { createRouter, createWebHistory } from 'vue-router'
import HomeView from '../views/HomeView.vue'

const router = createRouter({
  history: createWebHistory(import.meta.env.BASE_URL),
  routes: [
    {
      path: '/',
      name: 'home',
      component: HomeView
    },
    {
      path: '/about',
      name: 'about',
      // route level code-splitting
      // this generates a separate chunk (About.[hash].js) for this route
      // which is lazy-loaded when the route is visited.
      component: () => import('../views/AboutView.vue')
    },
    {
      path: '/login',
      name: 'login',
      component: () => import('../views/LoginView.vue')
    },
  ]
})

export default router
また、vue-firebase/src/App.vueにも追記しましょう。
  <RouterLink to="/about">About</RouterLink>
+ <router-link to="/login">Login</router-link>
画面上で確認してみましょう。(http://localhost:5173/login)
4.Firebase Authenticationとの連携
Firebase Authenticationの接続し、ログイン情報が正しいかどうかを判定させるようにします。
1)ユーザー登録
まずは、エミュレータの画面からユーザーを登録します。
http://127.0.0.1:4000/auth を開いてください。
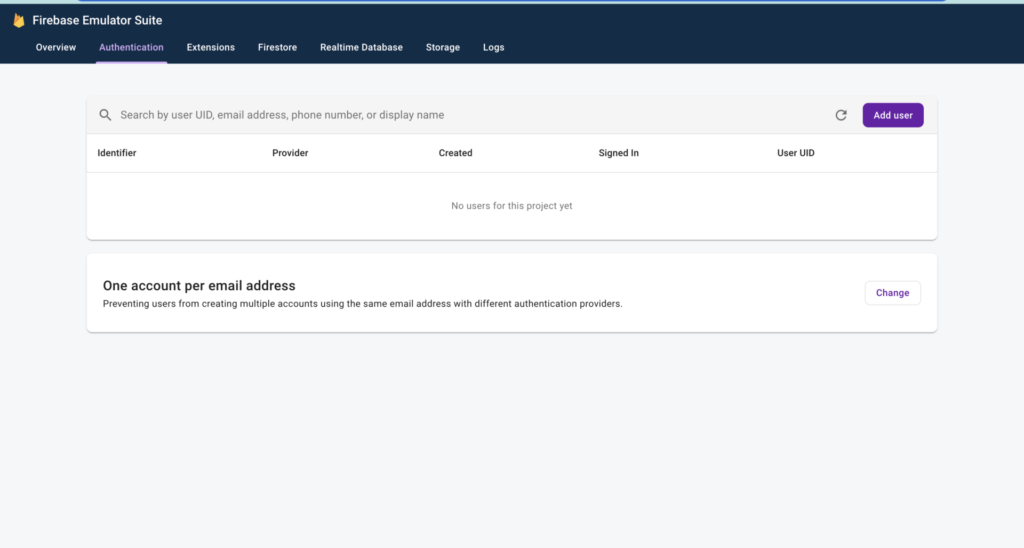
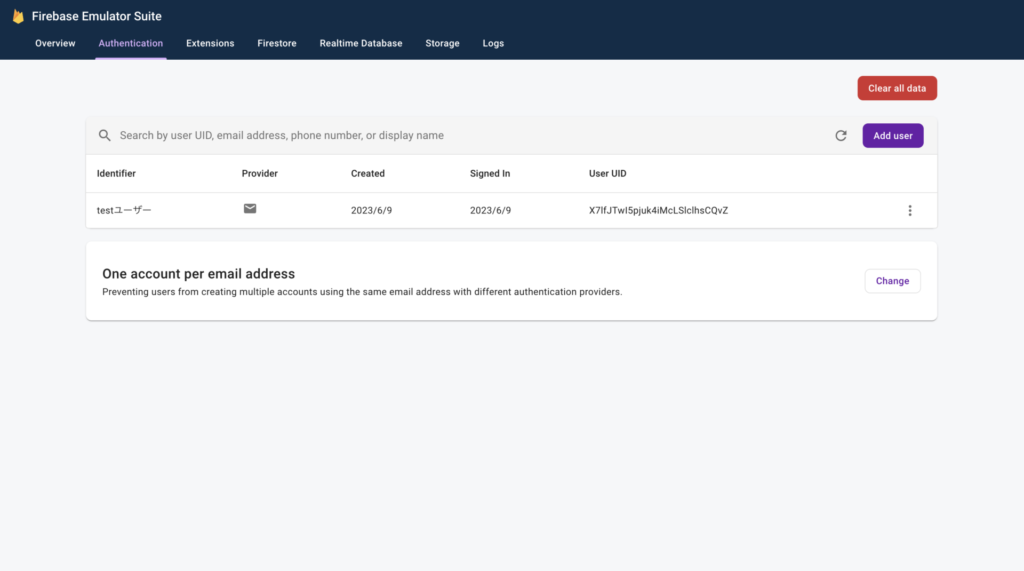
「Add user」ボタンを押して、データを登録してください。
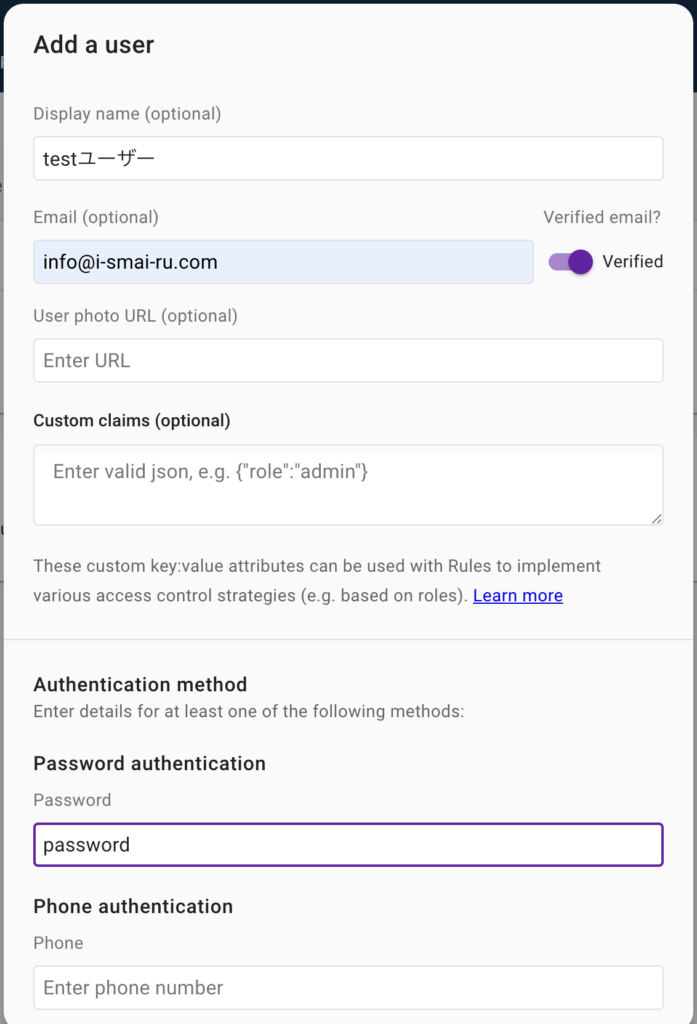
問題なければ、「Save」ボタンを押して登録してください。
※あくまでローカル環境でのテストデータとしてだけ利用してください。
2) ログイン機能の実装
ユーザー認証用にユーザーのメールアドレスとパスワードをFirebase に渡し、
Firebase SDK を使用してログインを実装していきます。
※公式ドキュメントは下記をご参考ください。
https://firebase.google.com/docs/auth/web/password-auth?hl=ja
Firebase SDKインストール
firebase SDKが提供する、signInWithEmailAndPasswordメソッドを利用してログイン機能を実装します。
SDKを利用するので、プロジェクト直下(vue-firebase/)でインストールを行います。
npm install firebasevue-firebase/package.jsonに、firebaseが追記されていることを確認してください。
firebase初期化用の共通ファイルの作成
firebase初期化用のファイル(vue-firebase/src/firebase.ts)を作成します。Firebaseのサービスを利用する場合はこのファイルをインポートするようにします。
import { initializeApp } from 'firebase/app'
import type { FirebaseApp } from 'firebase/app'
import { getAuth, connectAuthEmulator } from 'firebase/auth'
import type { Auth } from 'firebase/auth'

const firebaseConfig = {
  // Firebaseにデプロイする際は、自身のFirebaseプロジェクトの値を設定してください。
  apiKey: "YOUR_API_KEY",
  authDomain: "YOUR_AUTH_DOMAIN",
  projectId: "YOUR_PROJECT_ID",
  storageBucket: "YOUR_STORAGE_BUCKET",
  messagingSenderId: "YOUR_MESSAGING_SENDER_ID",
  appId: "YOUR_APP_ID",
  measurementId: "YOUR_MEASUREMENT_ID"
};

const firebase: FirebaseApp = initializeApp(firebaseConfig)

const auth: Auth = getAuth()

const useEmulator = window.location.hostname === 'localhost'
if (useEmulator) {
  connectAuthEmulator(auth, 'http://localhost:9099', { disableWarnings: true })
}

export { firebase, auth }
firebaseConfigの箇所は、ご自身の環境に合わせて設定してください。Firebaseのプロジェクト画面から確認できます。
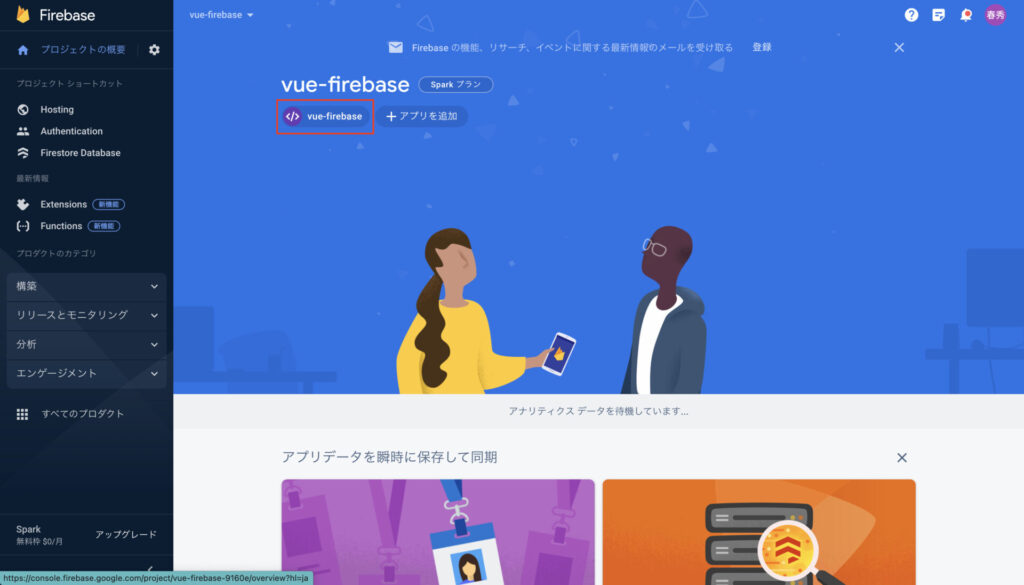
画面の赤枠にある前回作成したアプリ「vue-firebase」から確認してください。
なお、環境変数から読み込めるように後ほど修正いたします。
Authentication用の共通ファイルの作成
Authentication用の共通ファイルを作成します。(vue-firebase/src/stores/auth.ts)
import { defineStore } from 'pinia'
import { signInWithEmailAndPassword } from 'firebase/auth'
import { FirebaseError } from 'firebase/app'
import type { User } from 'firebase/auth'
import { auth } from '@/firebase'

export const useAuthStore = defineStore('auth', {
  state: () => ({
    // ブラウザリロード対策でuidのみ永続化しているため、初期値としてLocalStorageから取得可能
    currentUserId: localStorage.getItem('uid') || null,
    currentUser: null as User | null
  }),

  getters: {
    isLoggedIn: (state) => state.currentUser !== null
  },

  actions: {
    async loginWithEmailAndPassword(email: string, password: string) {
      try {
        // [Note] ブラウザの場合、認証情報はindexedDBに保持される
        // また、明示的にサインアウトしない限り認証状態は維持される
        // 参考 https://firebase.google.com/docs/auth/web/auth-state-persistence
        return await signInWithEmailAndPassword(auth, email, password)
      } catch (error) {
        if (error instanceof FirebaseError) {
          throw new Error(`認証に失敗しました。${error.code} : ${error.message}`)
        }
        throw new Error(
          'ネットワーク接続に問題がある可能性があります。お手数ですがしばらく時間をおいて再度ご登録ください。'
        )
      }
    },

    setUser(user: User) {
      this.currentUser = user
      this.currentUserId = user.uid

      // リロード対策のため、LocalStorageにUIDを永続化しておく
      localStorage.setItem('uid', user.uid)
    },

    clearUser() {
      this.$reset()
      localStorage.removeItem('uid')
    }
  }
})
Firebaseが用意してくれている。signInWithEmailAndPasswordメソッドを使うと、メールアドレスとパスワードでログイン出来ます。
状態管理
状態管理には、Piniaを使います。
useAuthStoreを定義し、Authenticationを利用する箇所で利用します。
また、LocalStorageにUIDを保存し、永続化します。ログインするとともに、localstorageniにsetUserを使って保存します。
また、ログアウト時に、clearUser()をします。ログアウトについては後ほど確認します。
LoginView.vueの変更-ログインの実装
vue-firebase/src/components/LoginView.vueでは、scriptタグの箇所が空でした。
scriptタグの箇所でlogin処理を追加するとともに、v-modelの設定をtemplateにしましょう。
<script setup lang="ts">
import { ref } from 'vue'
import type { User } from 'firebase/auth'
import { useAuthStore } from '../stores/auth'
import { useRouter } from 'vue-router'

const email = ref('')
const password = ref('')
const authStore = useAuthStore()
const router = useRouter()

const login = async () => {
  //TODO:バリデーション
  const userCredential = await authStore.loginWithEmailAndPassword(email.value, password.value)
  const user: User | null = userCredential.user
  if(user !== null ) {
    authStore.setUser(user)
    router.push('/')
    return
  }
  //TODO:エラー処理を追加すること。
}
</script>

<template>
  <div class="login">
    <div class="form-item">
      <label for="email">Email</label>
      <input id="email" autocomplete="off" type="text" v-model="email" />
    </div>
    <div class="form-item">
      <label for="password">Password</label>
      <input id="password" autocomplete="off" type="password" v-model="password" />
    </div>
    <div class="form-item">
      <button class="button" @click="login">ログイン</button>
    </div>
  </div>
</template>

<style scoped>
.login {
  margin-top: 2rem;
}
.form-item {
  margin-top: 2rem;
}
label {
  margin-right: 0.3rem;
}
</style>
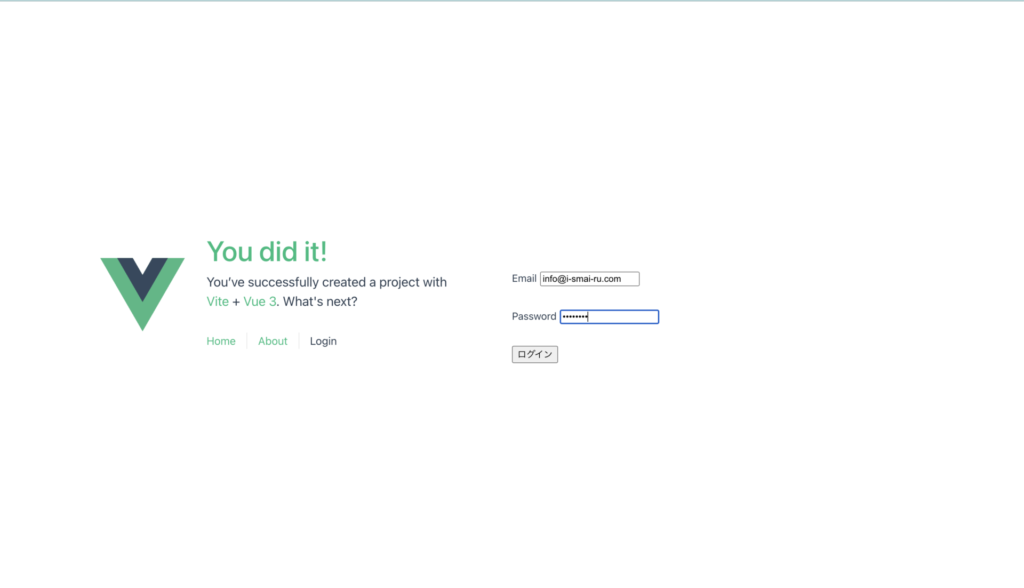
ここで画面でログインできるか確認してみましょう。
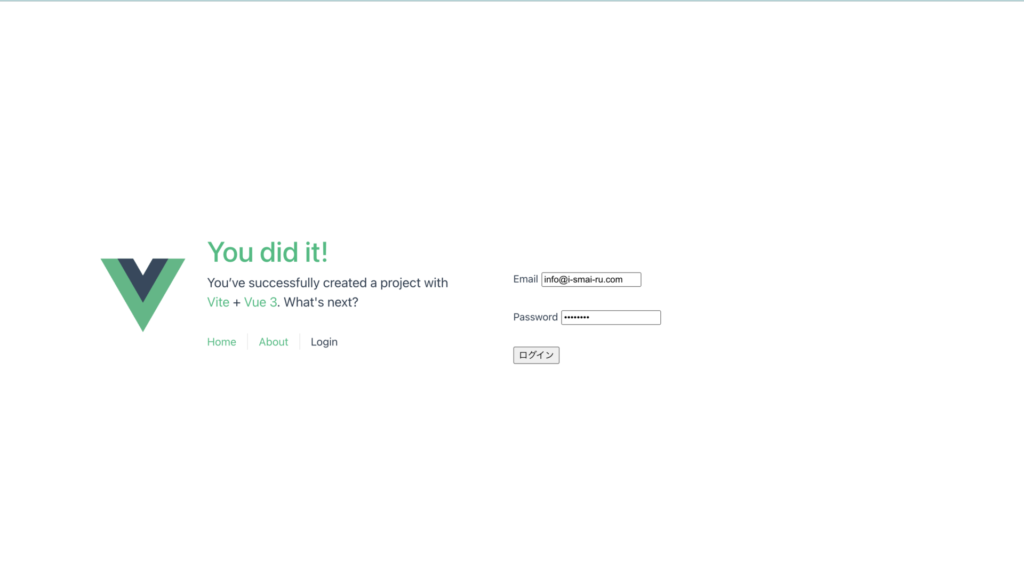
先ほど、登録したユーザーでログインしてみましょう。
ログインが成功し、トップに遷移していたらOKです。
開発者ツールでLocal Storageを確認してみましょう。
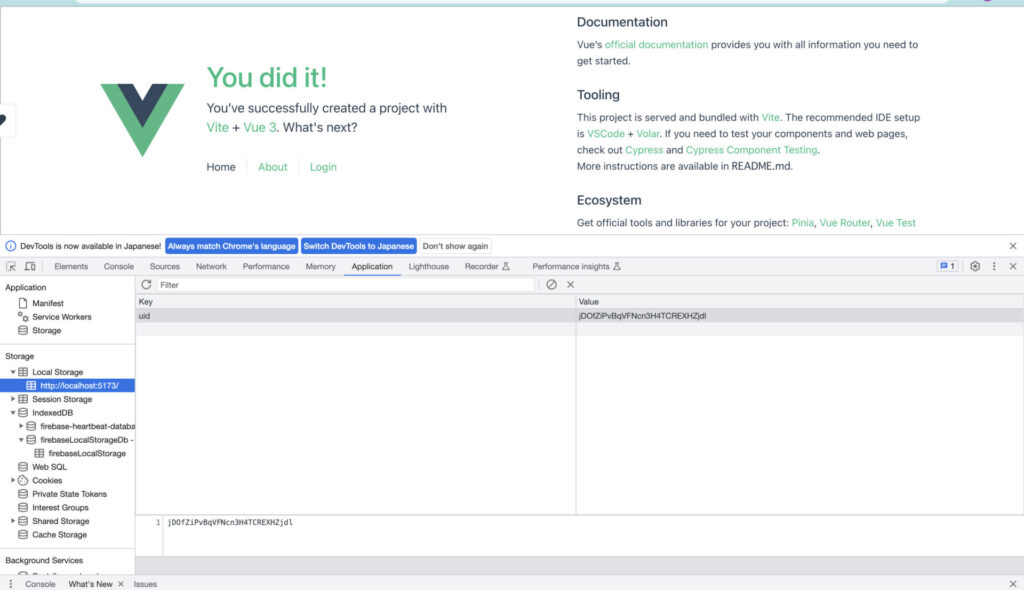
uidがセットされていたらOKです。
ログアウトの実装
認証状態について、Authenticationのデフォルト動作は、明示的なログアウトがない限り、永続化されます。
https://firebase.google.com/docs/auth/web/auth-state-persistence?hl=ja
まずは、画面を作成したいと思います。
ここでは、トップ画面にlogout項目を追加していきたいと思います。
ログインされている場合は、「logout」が表示され、ログインされていない場合は、「login」が表示されるという仕様にしたいと思います。
先に、vue-firebase/src/stores/auth.tsにlogoutメソッドを追加します。
また、Firebaseがページのリロード時に非同期でユーザー情報を取得している際に、ログアウト状態なってしまうのを防ぐために、初期化メソッドinitialize()を追加しています。
initialize()内では、onAuthStateChanged()が呼ばれていますが、これで解決が可能です。※ただし、onAuthStateChangedも非同期なのでわずかな間、認証されていない状態はありうる。これはローディング等で調整すること。
onAuthStateChanged
このリスナーの中でcurrentUserを更新することで、リロード時にも最新のユーザー状態(ログインしているかどうか等)を反映できます。つまり、onAuthStateChangedを使うことでFirebaseの認証状態とcurrentUserの状態を同期させ、currentUserが常に正しい状態を保つことができます。
import { defineStore } from 'pinia'
import { signInWithEmailAndPassword, signOut, onAuthStateChanged } from 'firebase/auth'
import { FirebaseError } from 'firebase/app'
import type { User } from 'firebase/auth'
import { auth } from '@/firebase'

export const useAuthStore = defineStore('auth', {
  state: () => ({
    // ブラウザリロード対策でuidのみ永続化しているため、初期値としてLocalStorageから取得可能
    currentUserId: localStorage.getItem('uid') || null,
    currentUser: null as User | null
  }),

  getters: {
    isLoggedIn: (state) => state.currentUser !== null
  },

  actions: {
    async loginWithEmailAndPassword(email: string, password: string) {
      try {
        // [Note] ブラウザの場合、認証情報はindexedDBに保持される
        // また、明示的にサインアウトしない限り認証状態は維持される
        // 参考 https://firebase.google.com/docs/auth/web/auth-state-persistence
        return await signInWithEmailAndPassword(auth, email, password)
      } catch (error) {
        if (error instanceof FirebaseError) {
          throw new Error(`認証に失敗しました。${error.code} : ${error.message}`)
        }
        throw new Error(
          'ネットワーク接続に問題がある可能性があります。お手数ですがしばらく時間をおいて再度ご登録ください。'
        )
      }
    },

    initialize() {
      onAuthStateChanged(auth, (user) => {
        if (user) {
          this.setUser(user)
        } else {
          this.clearUser()
        }
      })
    },

    async logout() {
      if (auth.currentUser) {
        await signOut(auth);
        this.clearUser();
        return
      }
    },
    setUser(user: User) {
      this.currentUser = user
      this.currentUserId = user.uid

      // リロード対策のため、LocalStorageにUIDを永続化しておく
      localStorage.setItem('uid', user.uid)
    },

    clearUser() {
      this.$reset()
      localStorage.removeItem('uid')
    }
  }
})
v-if ディレクティブを利用します。vue-firebase/src/App.vueを下記のように変更してください。
<script setup lang="ts">
import { RouterLink, RouterView, useRouter } from 'vue-router'
import HelloWorld from './components/HelloWorld.vue'
import { useAuthStore } from './stores/auth'
const authStore = useAuthStore()
authStore.initialize()
const router = useRouter()

// ログアウト処理
const logout = async () => {
  await authStore.logout()
  router.push('/login')
}
</script>

<template>
  <header>
    <img alt="Vue logo" class="logo" src="@/assets/logo.svg" width="125" height="125" />

    <div class="wrapper">
      <HelloWorld msg="You did it!" />

      <nav>
        <RouterLink to="/">Home</RouterLink>
        <RouterLink to="/about">About</RouterLink>

        <!-- isLoggedIn を使って表示を切り替える -->
        <router-link v-if="authStore.isLoggedIn" to="/login" @click="logout">Logout</router-link>
        <router-link v-else to="/login">Login</router-link>
      </nav>
    </div>
  </header>

  <RouterView />
</template>

<style scoped>
header {
  line-height: 1.5;
  max-height: 100vh;
}

.logo {
  display: block;
  margin: 0 auto 2rem;
}

nav {
  width: 100%;
  font-size: 12px;
  text-align: center;
  margin-top: 2rem;
}

nav a.router-link-exact-active {
  color: var(--color-text);
}

nav a.router-link-exact-active:hover {
  background-color: transparent;
}

nav a {
  display: inline-block;
  padding: 0 1rem;
  border-left: 1px solid var(--color-border);
}

nav a:first-of-type {
  border: 0;
}

@media (min-width: 1024px) {
  header {
    display: flex;
    place-items: center;
    padding-right: calc(var(--section-gap) / 2);
  }

  .logo {
    margin: 0 2rem 0 0;
  }

  header .wrapper {
    display: flex;
    place-items: flex-start;
    flex-wrap: wrap;
  }

  nav {
    text-align: left;
    margin-left: -1rem;
    font-size: 1rem;

    padding: 1rem 0;
    margin-top: 1rem;
  }
}
</style>
それでは、ログアウトの動作を画面で確認してみましょう。
ログインします。
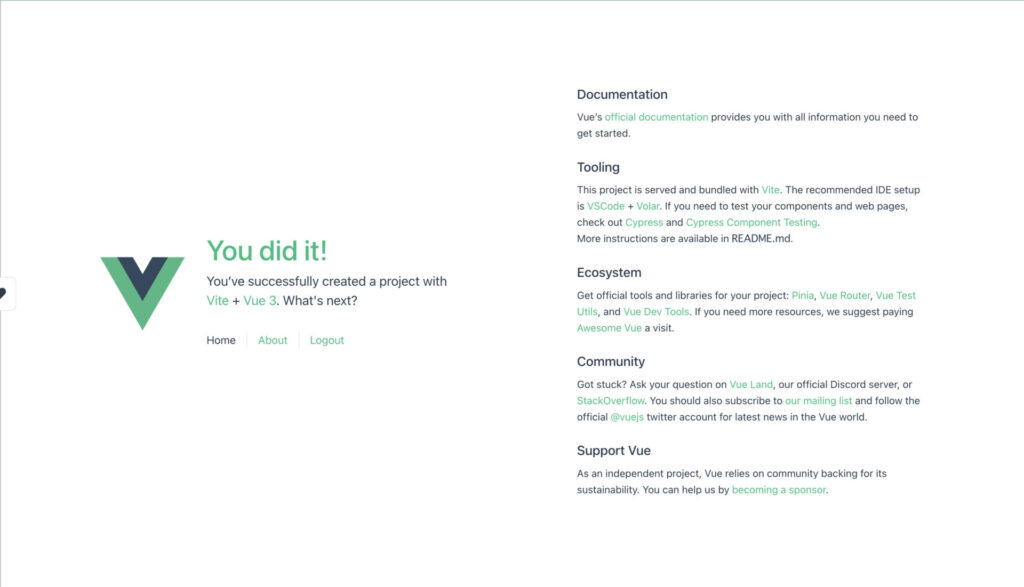
ログイン後、トップに遷移し、logoutが表示されているのがわかります。
「Logout」を押します。
ログアウトされ、ログイン画面が表示されます。
5.エクスポート
今回エミュレータ上でユーザーを作成しましたが、エクスポートし、次回のエミュレータ起動時にデータを取り込むことが可能です。
下記を実行し、エクスポートしてください。
firebase emulators:export ./export/vue-firebase/exportにデータがエクスポートされました。
エミュレータ起動時は下記のコマンドでインポート出来ます。
firebase emulators:start --import=./exportそのままでもいいのですが、ここでは、package.jsonに記載しコマンド化します。
scriptsに下記を追記してください。
"scripts": {
    ...
    "emulators": "firebase emulators:start --import=./export"
  },
次回からエミュレータ起動時には、下記のコマンドを使ってください。
npm run emulators6.おわりに
完成です!